Configure DHCP IPv4 on Cisco Router
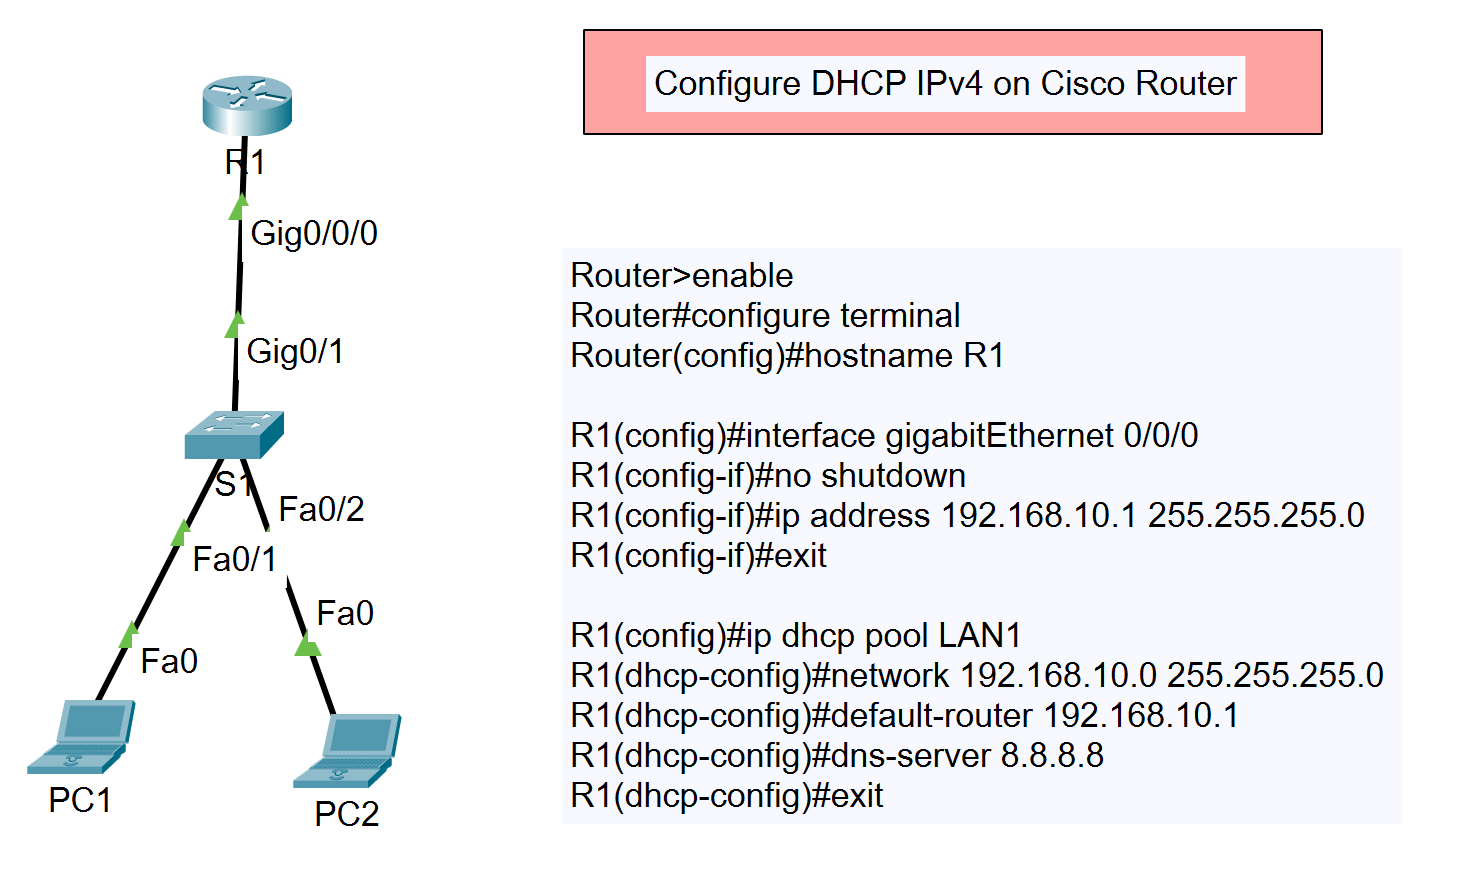
In this tutorial, we will configure DHCP IPv4 on a Cisco Router. The topology consists of a router (R1), a switch (S1), and two PCs (PC1 and PC2). The goal is to enable DHCP on R1 so that it can dynamically assign IP addresses to the PCs connected to S1.
Network Topology
Type of DHCP IPv4
- DHCP IPv4 on Cisco Router
- DHCP IPv4 on Cisco Layer 3 Switch or Multilayer Switch
- DHCP IPv4 on Cisco Router with 2 Networks
- DHCP IPv4 on Cisco Layer 3 Switch or Multilayer Switch with 2 VLANs
Steps to Configure DHCP IPv4 on Cisco Router
- Access the Router:
Connect to the router using a console cable and access the CLI (Command Line Interface). - Enter Privileged EXEC Mode:
Router> enable
- Enter Global Configuration Mode:
Router# configure terminal
- Set the Hostname:
Router(config)# hostname R1
- Configure the GigabitEthernet Interface:
- Enter the interface configuration mode:
R1(config)# interface gigabitEthernet 0/0/0
- Enable the interface:
R1(config-if)# no shutdown
- Assign an IP address to the interface:
R1(config-if)# ip address 192.168.10.1 255.255.255.0
- Exit the interface configuration mode:
R1(config-if)# exit
- Enter the interface configuration mode:
- Configure DHCP:
- Create a DHCP pool named LAN1:
R1(config)# ip dhcp pool LAN1
- Define the network range for the DHCP pool:
R1(dhcp-config)# network 192.168.10.0 255.255.255.0
- Set the default gateway for DHCP clients:
R1(dhcp-config)# default-router 192.168.10.1
- Specify the DNS server for DHCP clients:
R1(dhcp-config)# dns-server 8.8.8.8
- Exit the DHCP configuration mode:
R1(dhcp-config)# exit
- Create a DHCP pool named LAN1:
- Save the Configuration:
R1# write memory
Verification
To verify the DHCP configuration, connect PC1 and PC2 to the switch and check if they receive IP addresses dynamically from the router.
- Check IP Address on PC1:
- On PC1, open the command prompt and type:
ipconfig
- Verify that PC1 has an IP address in the range 192.168.10.x.
- On PC1, open the command prompt and type:
- Check IP Address on PC2:
- On PC2, open the command prompt and type:
ipconfig
- Verify that PC2 has an IP address in the range 192.168.10.x.
- On PC2, open the command prompt and type:
Conclusion
Configuring DHCP on a Cisco router allows for efficient IP address management within a network. By following the steps outlined in this tutorial, you can set up DHCP IPv4 on your Cisco router and ensure dynamic IP assignment to connected devices.