Configure Inter-VLAN Routing as Router-on-a-Stick on Cisco Router
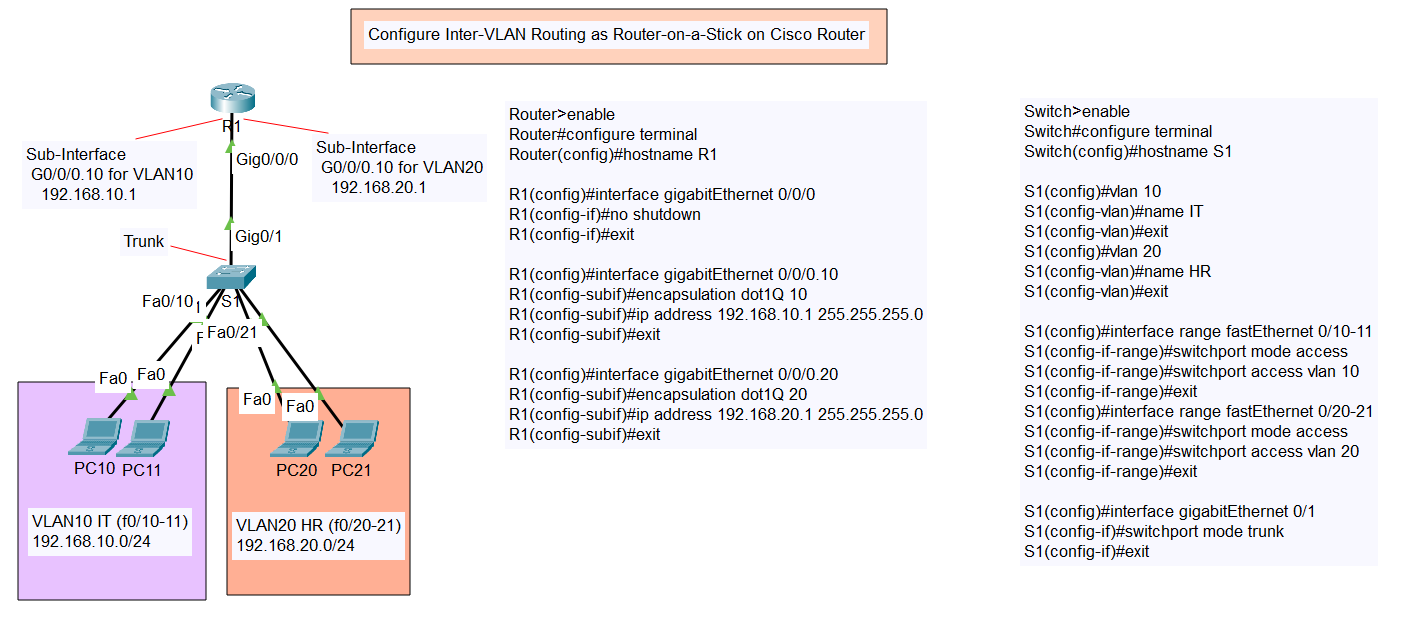
Inter-VLAN routing is crucial for allowing communication between different VLANs within a network. In this tutorial, we’ll configure inter-VLAN routing using the Router-on-a-Stick method on a Cisco router. Follow the steps below to set up the topology shown in the image.
Topology Overview
Type of Inter-VLAN Routing
In this topology, we have:
- A Cisco Router (R1) connected to a Cisco Switch (S1) via a trunk link.
- Two VLANs:
- VLAN 10 (IT) with subnet 192.168.10.0/24
- VLAN 20 (HR) with subnet 192.168.20.0/24
- PCs in each VLAN:
- PC10 and PC11 in VLAN 10
- PC20 and PC21 in VLAN 20
Type of Inter-VLAN Routing
Router Configuration
- Enable the Router and Enter Global Configuration Mode
Router>enable
Router#configure terminal
Router(config)#hostname R1
- Configure the Physical Interface (GigabitEthernet 0/0/0)
R1(config)#interface gigabitEthernet 0/0/0
R1(config-if)#no shutdown
R1(config-if)#exit
- Create Sub-Interface for VLAN 10
R1(config)#interface gigabitEthernet 0/0/0.10
R1(config-subif)#encapsulation dot1Q 10
R1(config-subif)#ip address 192.168.10.1 255.255.255.0
R1(config-subif)#exit
- Create Sub-Interface for VLAN 20
R1(config)#interface gigabitEthernet 0/0/0.20
R1(config-subif)#encapsulation dot1Q 20
R1(config-subif)#ip address 192.168.20.1 255.255.255.0
R1(config-subif)#exit
Switch Configuration
- Enable the Switch and Enter Global Configuration Mode
Switch>enable
Switch#configure terminal
Switch(config)#hostname S1
- Create VLANs and Assign Names
S1(config)#vlan 10
S1(config-vlan)#name IT
S1(config-vlan)#exit

S1(config)#vlan 20
S1(config-vlan)#name HR
S1(config-vlan)#exit
- Assign VLANs to Ports
S1(config)#interface range fastEthernet 0/10-11
S1(config-if-range)#switchport mode access
S1(config-if-range)#switchport access vlan 10
S1(config-if-range)#exit

S1(config)#interface range fastEthernet 0/20-21
S1(config-if-range)#switchport mode access
S1(config-if-range)#switchport access vlan 20
S1(config-if-range)#exit
- Configure Trunk Port
S1(config)#interface gigabitEthernet 0/1
S1(config-if)#switchport mode trunk
S1(config-if)#exit
Conclusion
By following these steps, you have successfully configured inter-VLAN routing using the Router-on-a-Stick method on a Cisco router. This setup enables communication between devices in different VLANs while maintaining VLAN segmentation.
Feel free to leave a comment if you have any questions or run into any issues!