Configure Legacy Inter-VLAN Routing on Cisco Router
In this guide, we’ll walk you through the steps to configure legacy inter-VLAN routing on a Cisco router. Inter-VLAN routing allows different VLANs to communicate with each other. This setup is crucial in network environments that need to segment traffic for security and management purposes while still enabling communication between VLANs.
Network Topology
The network topology consists of a router, a switch, and four PCs divided into two VLANs:
- VLAN 10 (IT) with IP range
192.168.10.0/24 - VLAN 20 (HR) with IP range
192.168.20.0/24
The router interfaces are configured as follows:
- Gig0/0/1:
192.168.10.1assigned to VLAN 10 - Gig0/0/0:
192.168.20.1assigned to VLAN 20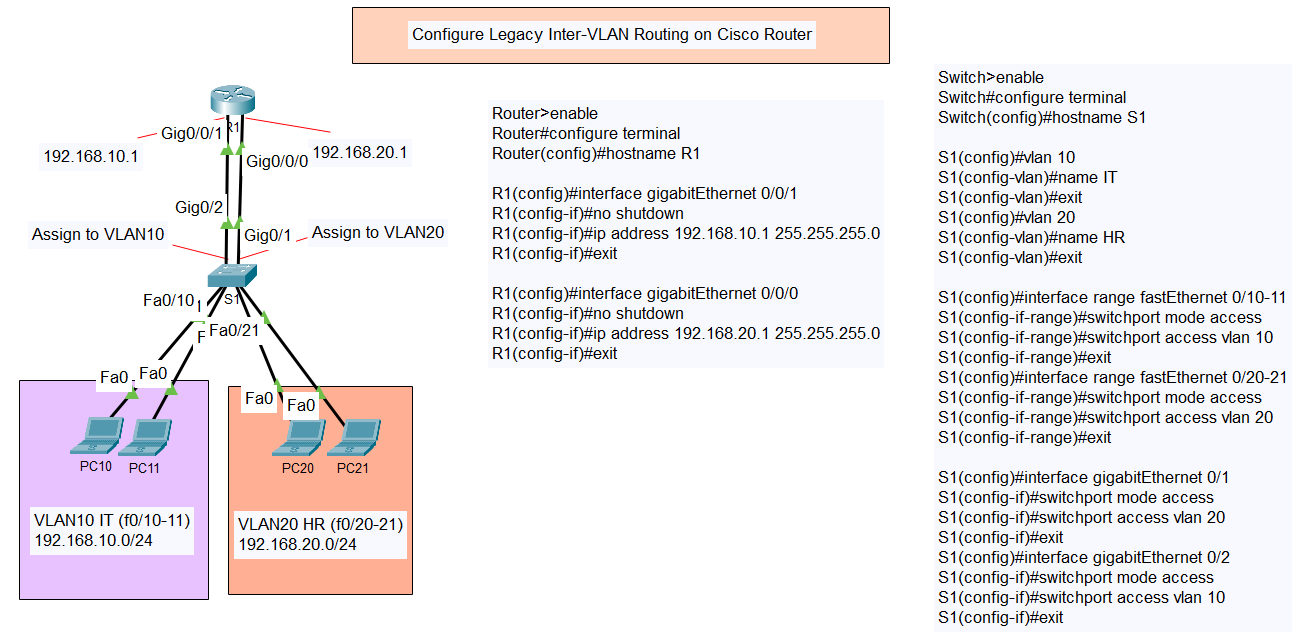
Configure Legacy Inter-VLAN Routing on Cisco Router Topology
Type of Inter-VLAN Routing
Step-by-Step Configuration
Router Configuration
- Access the router and enter privileged EXEC mode:
Router>enable
- Enter global configuration mode:
Router#configure terminal
Router(config)#hostname R1
- Configure the interfaces:
- For VLAN 10:
R1(config)#interface gigabitEthernet 0/0/1
R1(config-if)#no shutdown
R1(config-if)#ip address 192.168.10.1 255.255.255.0
R1(config-if)#exit
- For VLAN 20:
R1(config)#interface gigabitEthernet 0/0/0
R1(config-if)#no shutdown
R1(config-if)#ip address 192.168.20.1 255.255.255.0
R1(config-if)#exit
- For VLAN 10:
Switch Configuration
- Access the switch and enter privileged EXEC mode:
Switch>enable
- Enter global configuration mode:
Switch#configure terminal
Switch(config)#hostname S1
- Create VLANs and assign names:
- VLAN 10:
S1(config)#vlan 10
S1(config-vlan)#name IT
S1(config-vlan)#exit
- VLAN 20:
S1(config)#vlan 20
S1(config-vlan)#name HR
S1(config-vlan)#exit
- VLAN 10:
- Assign VLANs to the switch ports:
- For VLAN 10:
S1(config)#interface range fastEthernet 0/10-11
S1(config-if-range)#switchport mode access
S1(config-if-range)#switchport access vlan 10
S1(config-if-range)#exit
- For VLAN 20:
S1(config)#interface range fastEthernet 0/20-21
S1(config-if-range)#switchport mode access
S1(config-if-range)#switchport access vlan 20
S1(config-if-range)#exit
- For VLAN 10:
- Assign VLANs to the router interfaces:
- For VLAN 20:
S1(config)#interface gigabitEthernet 0/1
S1(config-if)#switchport mode access
S1(config-if)#switchport access vlan 20
S1(config-if)#exit
- For VLAN 10:
S1(config)#interface gigabitEthernet 0/2
S1(config-if)#switchport mode access
S1(config-if)#switchport access vlan 10
S1(config-if)#exit
- For VLAN 20:
Conclusion
By following these steps, you can successfully configure legacy inter-VLAN routing on a Cisco router. This setup ensures that different VLANs can communicate with each other, enhancing network efficiency and management. Proper VLAN configuration and inter-VLAN routing are essential for maintaining a segmented yet interconnected network environment.
Feel free to leave any questions or comments below and happy networking!