Configure SSH v2 on a Cisco Router with Radius Server and Local as Fallback
In this tutorial, we will guide you through the process of configuring SSH v2 on a Cisco router using a Radius server for authentication. This setup is crucial for secure remote management and ensures that only authenticated users can access the router.
Network Topology
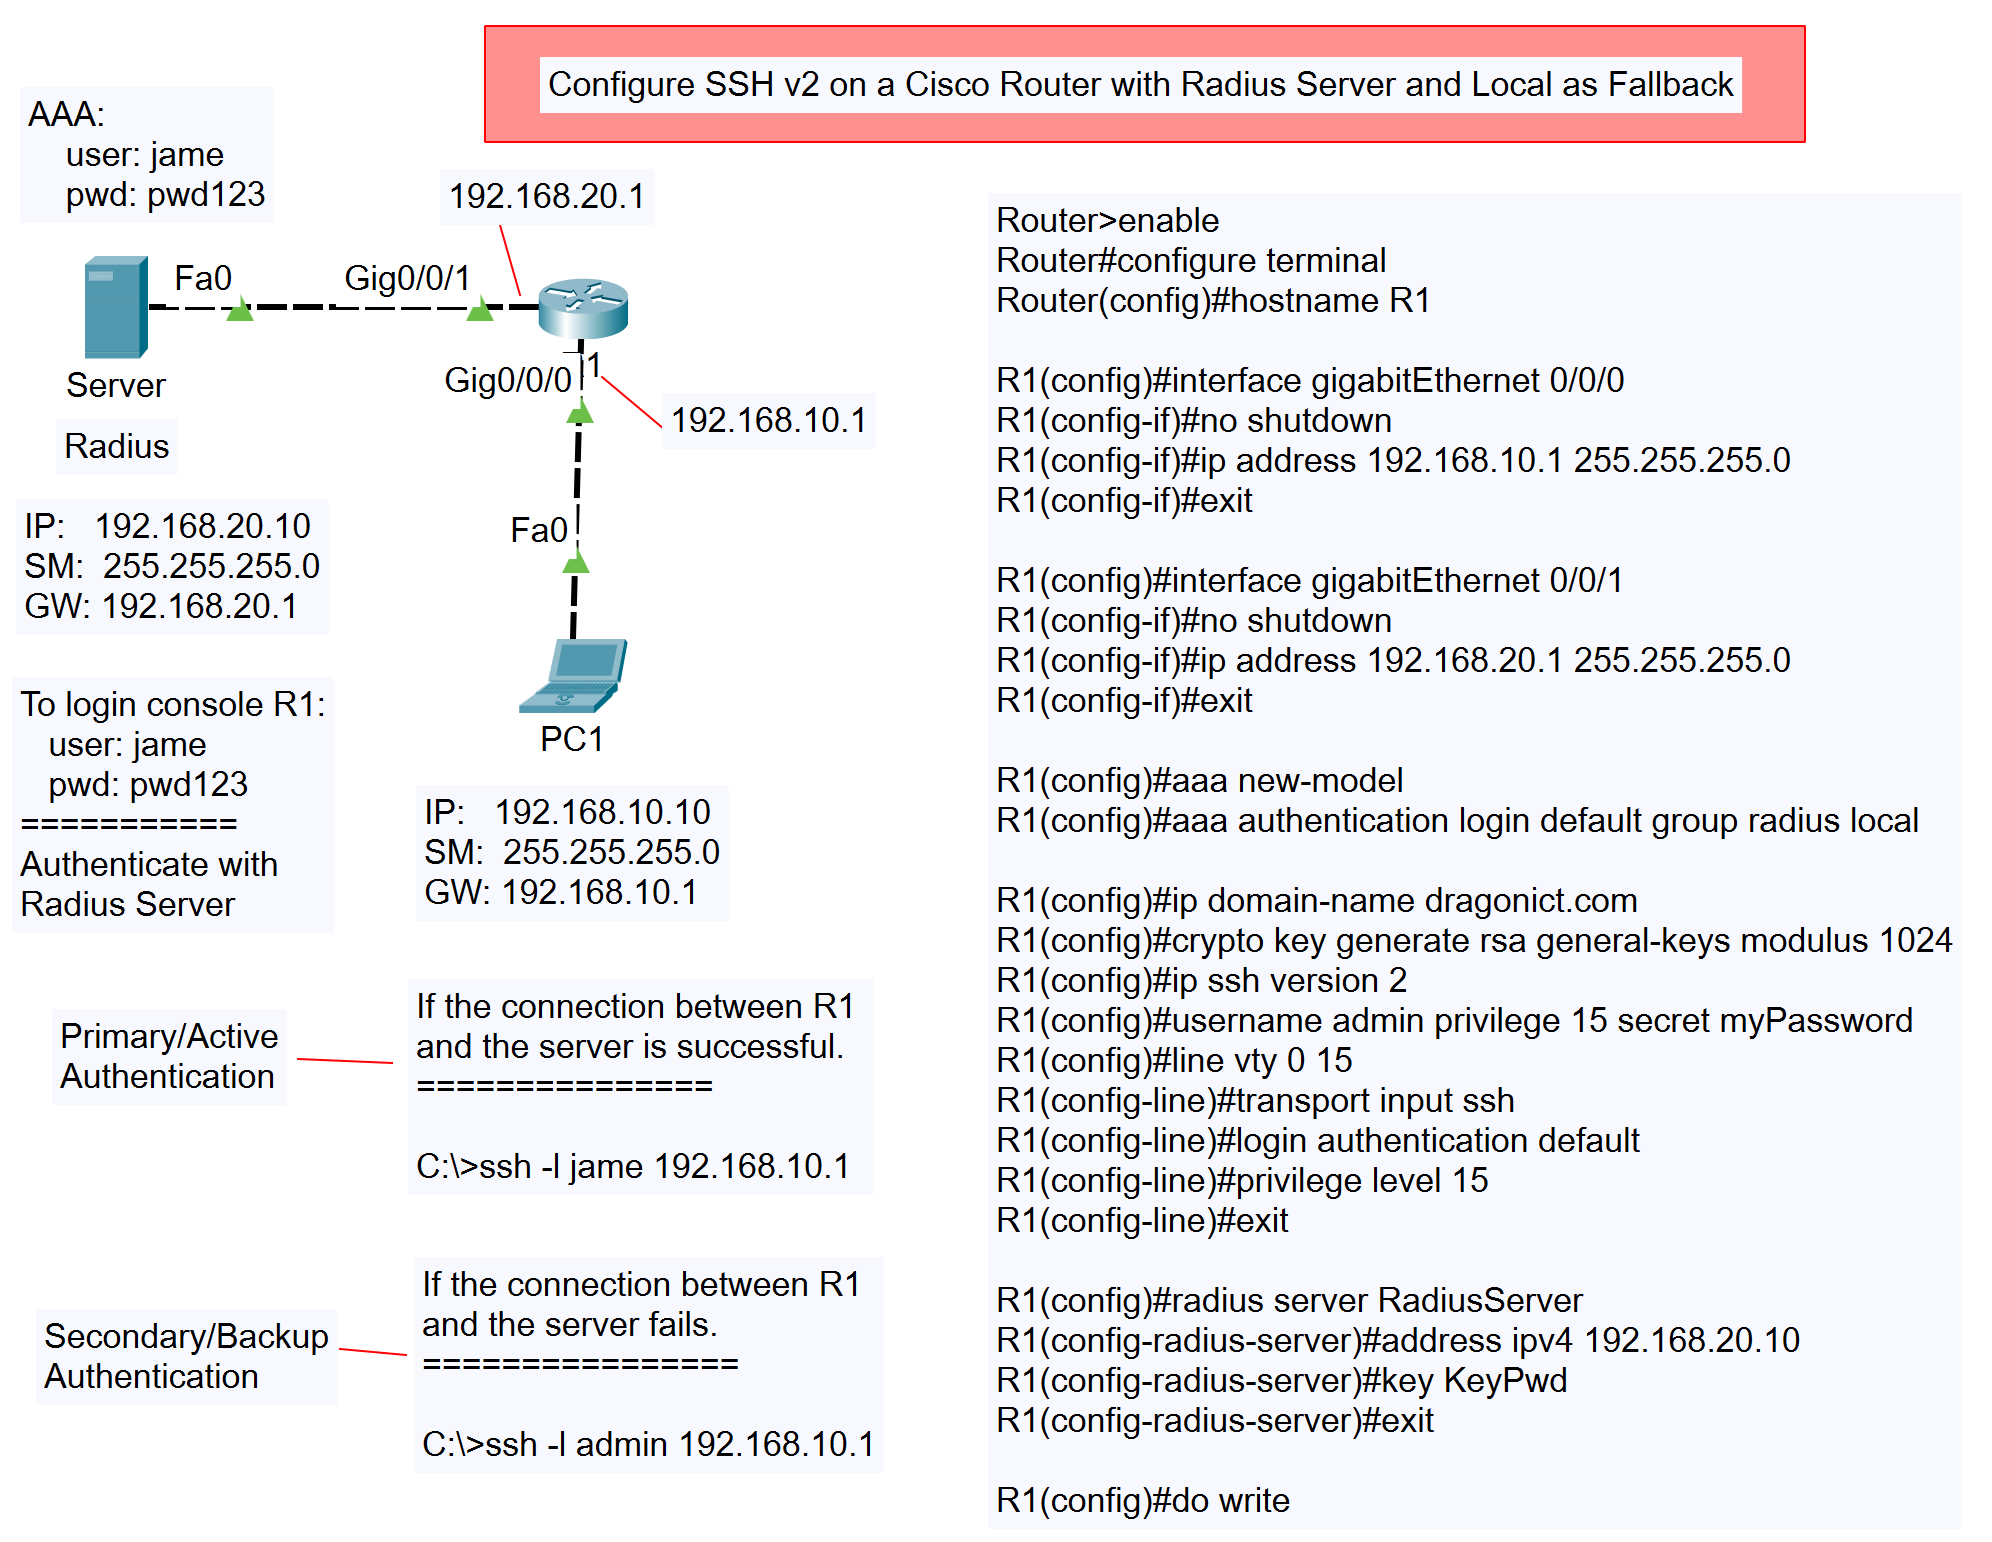
Before diving into the configuration, let’s understand the network topology:
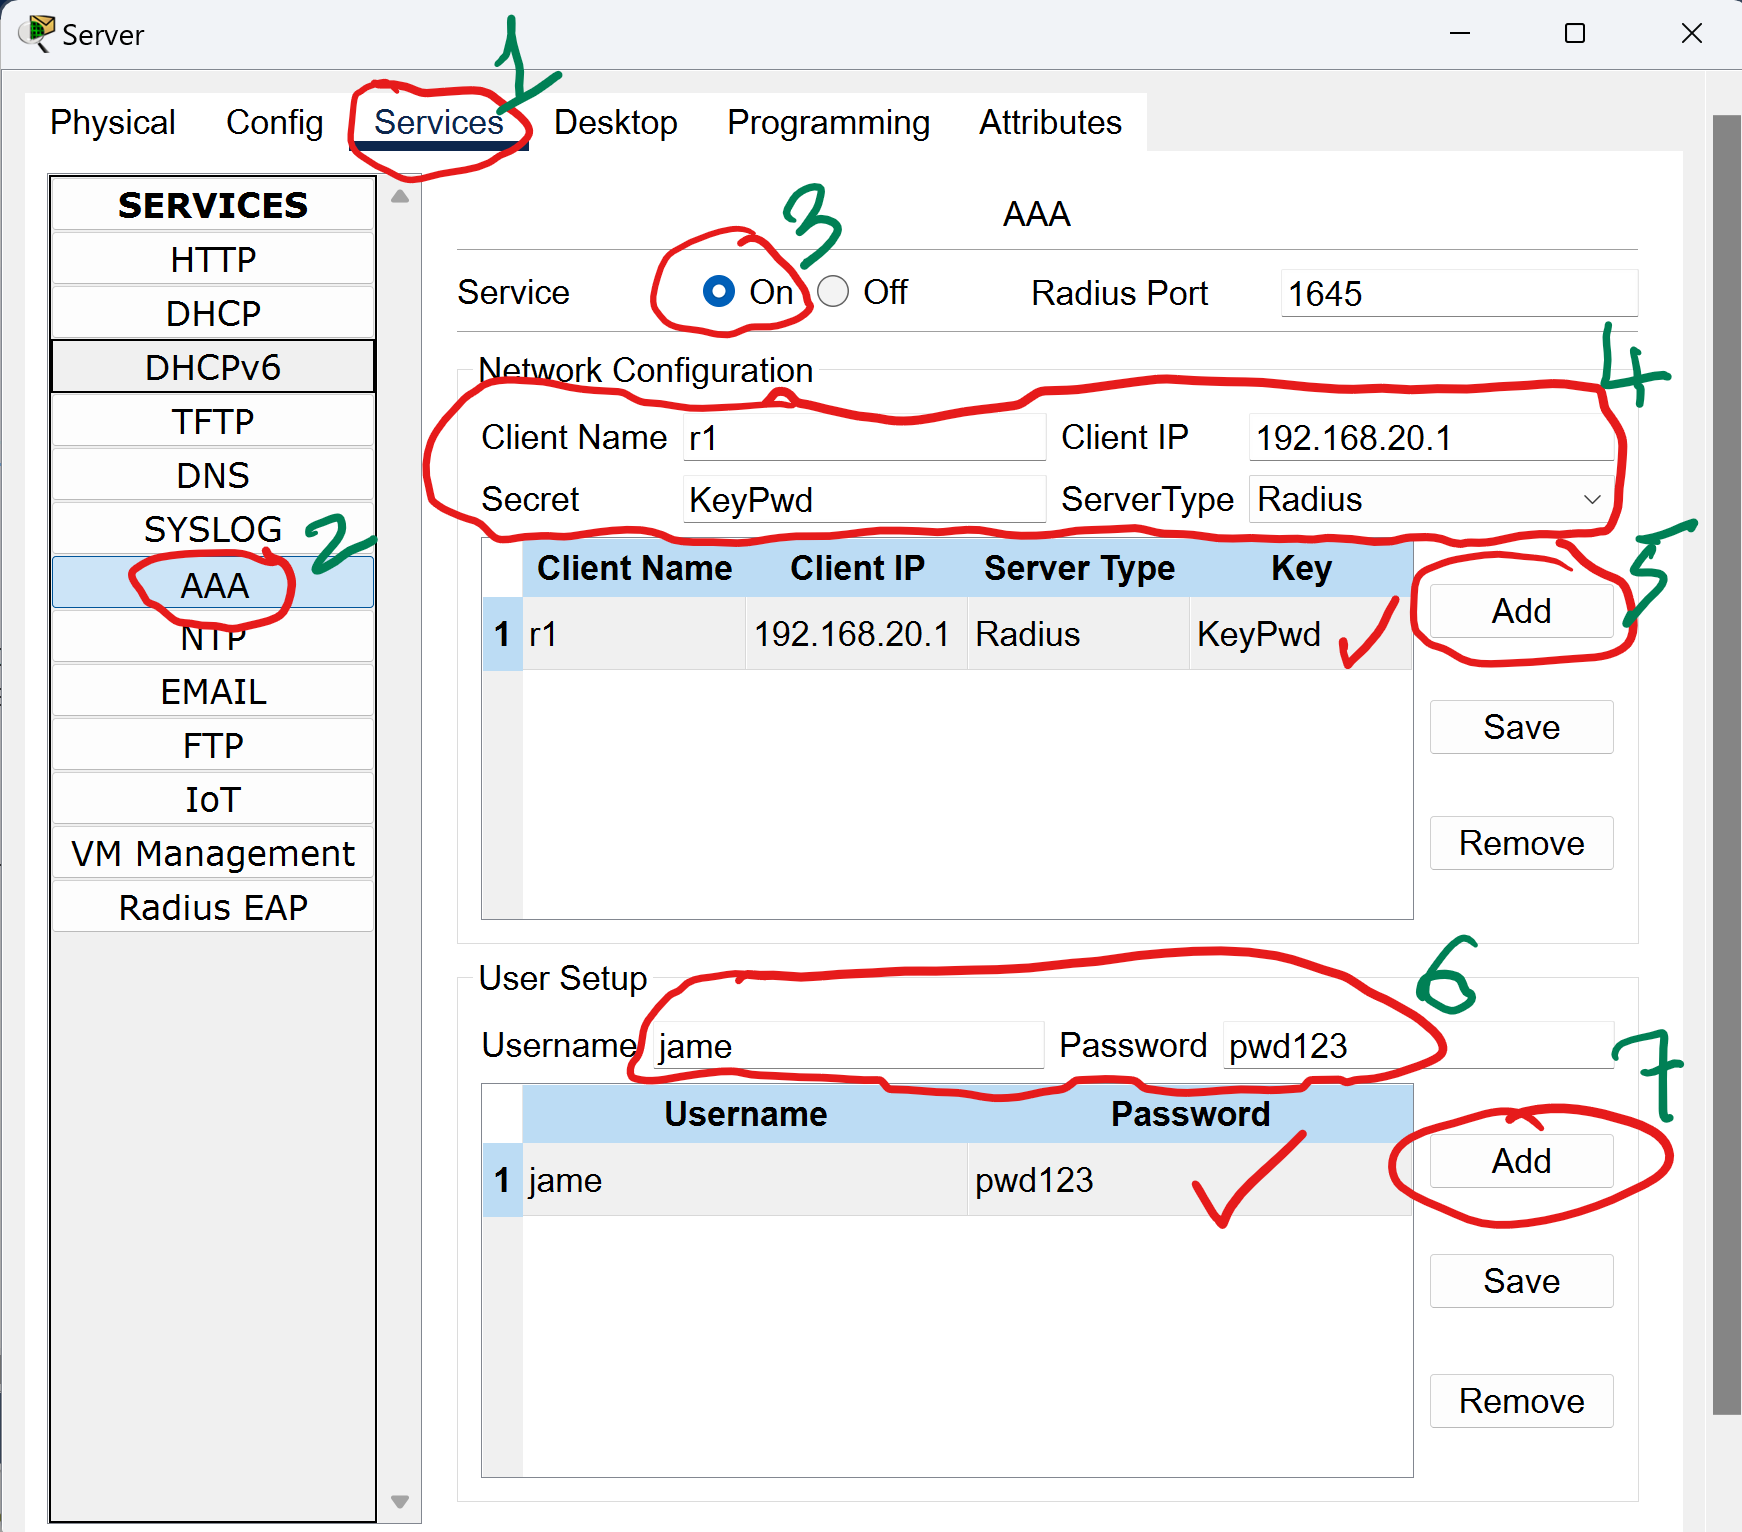
- Server:
- IP:
192.168.20.10 - Subnet Mask:
255.255.255.0 - Gateway:
192.168.20.1 - AAA Configuration:
- Username:
jame - Password:
pwd123
- Username:
- IP:
- Router R1:
- Interface
Gig0/0/0connected to Server:- IP:
192.168.20.1 - Subnet Mask:
255.255.255.0
- IP:
- Interface
Gig0/0/1connected to PC1:- IP:
192.168.10.1 - Subnet Mask:
255.255.255.0
- IP:
- Interface
- PC1:
- IP:
192.168.10.10 - Subnet Mask:
255.255.255.0 - Gateway:
192.168.10.1
- IP:
Type of SSH v2
- Configure SSH v2 on Cisco Switch
- Configure SSH v2 on Cisco Router
- Configure SSH v2 on a Cisco Router with Radius Server and Local as Fallback
Step-by-Step Configuration
- Configure the Router Hostname
Router#configure terminal
Router(config)#hostname R1
Explanation: Setting the router’s hostname to easily identify it within the network.
- Configure Interfaces
- Gig0/0/0 (Connected to Server):
R1(config)#interface gigabitEthernet 0/0/0
R1(config-if)#no shutdown
R1(config-if)#ip address 192.168.10.1 255.255.255.0
R1(config-if)#exit
Explanation: Configures the IP address for the interface connected to the server and ensures the interface is active.
- Gig0/0/1 (Connected to PC1):
R1(config)#interface gigabitEthernet 0/0/1
R1(config-if)#no shutdown
R1(config-if)#ip address 192.168.20.1 255.255.255.0
R1(config-if)#exit
Explanation: Configures the IP address for the interface connected to PC1 and ensures the interface is active.
- Gig0/0/0 (Connected to Server):
- Enable SSH and Configure User Authentication
R1(config)#aaa new-model
R1(config)#aaa authentication login default group radius local
Explanation: Enables AAA (Authentication, Authorization, and Accounting) on the router and sets the default authentication method to use a Radius server, with local authentication as a fallback.
- Configure SSH on the Router
R1(config)#ip domain-name dragonict.com
R1(config)#crypto key generate rsa general-keys modulus 1024
R1(config)#ip ssh version 2
Explanation: Sets up SSH version 2 on the router, generates RSA keys, and configures a domain name required for SSH key generation.
- Create a Local User for Backup Authentication
R1(config)#username admin privilege 15 secret myPassword
Explanation: Creates a local user named
adminwith a privileged level of 15, which is used as a backup in case the Radius server is unreachable. - Configure VTY Lines for SSH Access
R1(config)#line vty 0 15
R1(config-line)#transport input ssh
R1(config-line)#login authentication default
R1(config-line)#privilege level 15
R1(config-line)#exit
Explanation:
- Configures all VTY lines to accept SSH connections only, using the AAA authentication method.
- The command
privilege level 15is significant as it assigns the highest level of privileges to the user logging in through these lines. Privilege levels on Cisco devices range from 0 to 15, with level 15 being the most privileged, typically granting full access to all commands. By assigning this level, you ensure that users who authenticate successfully through these VTY lines have complete control over the router, allowing them to perform any necessary administrative tasks.
- Configure Radius Server on the Router
R1(config)#radius server RadiusServer
R1(config-radius-server)#address ipv4 192.168.20.10
R1(config-radius-server)#key KeyPwd
R1(config-radius-server)#exit
Explanation: Defines the Radius server on the router, specifying the IP address and the shared key that matches the one configured on the Radius server.
- Save Configuration
R1(config)#do write
Explanation: Saves the current configuration to the startup configuration file, ensuring it persists after a reboot.
Verification Steps
- Primary/Active Authentication:
C:\>ssh -l jame 192.168.10.1
Expected Outcome: The SSH connection should prompt for the username and password configured in the Radius server.
- Secondary/Backup Authentication:
C:\>ssh -l admin 192.168.10.1
Expected Outcome: The SSH connection should fall back to local authentication using the credentials
jame/pwd123.
Use Case
This configuration is particularly useful in environments where centralized authentication is required for security and management purposes. By integrating the router with a Radius server, network administrators can ensure consistent authentication policies across multiple devices. The local authentication serves as a fail-safe, ensuring access is maintained even if the Radius server becomes unreachable.