Configure SSH v2 on a Cisco Router
In this tutorial, we will guide you through the steps to configure SSH version 2 on a Cisco router. SSH provides a secure channel for accessing the router remotely, ensuring that your management sessions are encrypted. Below is a topology image and a step-by-step guide to achieve this configuration.
Network Topology
Topology Details:
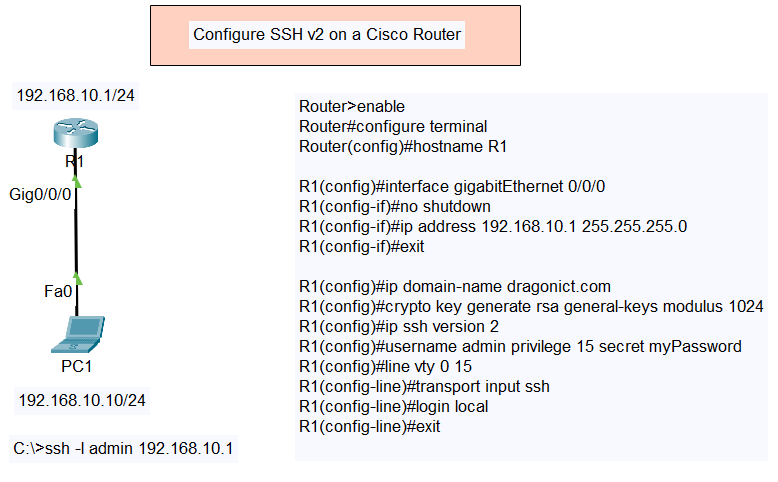
- Router (R1) with IP address
192.168.10.1/24on interfaceGig0/0/0 - PC (PC1) with IP address
192.168.10.10/24connected to the router viaFa0
Type of SSH v2
- Configure SSH v2 on Cisco Switch
- Configure SSH v2 on Cisco Router
- Configure SSH v2 on a Cisco Router with Radius Server and Local as Fallback
Configuration Steps
- Enter Global Configuration Mode:
Router>enable Router#configure terminal - Set the Hostname:
Router(config)#hostname R1 - Configure the Interface:
- Assign IP address to the interface.
- Enable the interface.
R1(config)#interface gigabitEthernet 0/0/0 R1(config-if)#no shutdown R1(config-if)#ip address 192.168.10.1 255.255.255.0 R1(config-if)#exit - Configure SSH:
- Set the domain name.
- Generate RSA keys.
- Enable SSH version 2.
- Create a username and password.
- Configure the VTY lines to use SSH.
R1(config)#ip domain-name dragonict.com R1(config)#crypto key generate rsa general-keys modulus 1024 R1(config)#ip ssh version 2 R1(config)#username admin privilege 15 secret myPassword R1(config)#line vty 0 15 R1(config-line)#transport input ssh R1(config-line)#login local R1(config-line)#exit - Verification:
- Use a PC to SSH into the router.
C:\>ssh -l admin 192.168.10.1
Conclusion
Following the above steps will enable SSH version 2 on your Cisco router, ensuring secure remote management access. Make sure to replace the domain, user, and password values with your actual domain name and preferred username/password for security purposes.
By configuring SSH, you are adding a layer of security to your network management practices, protecting your network from unauthorized access.
Feel free to reach out in the comments if you have any questions or encounter any issues during the configuration. Happy networking!