Configure SSH v2 on a Cisco Switch
Introduction
Secure Shell (SSH) is a crucial protocol for securing remote access to network devices. In this guide, we’ll walk you through the steps to configure SSH version 2 on a Cisco switch. This will ensure that your remote management sessions are encrypted and secure.
Topology
Type of SSH v2
- Configure SSH v2 on Cisco Switch
- Configure SSH v2 on Cisco Router
- Configure SSH v2 on a Cisco Router with Radius Server and Local as Fallback
Step-by-Step Guide to Configure SSH v2
- Access the Switch CLI
- Connect to your Cisco switch using a console cable and terminal software, or via Telnet/SSH if already configured.
- Enter Global Configuration Mode
Switch> enable
Switch# configure terminal
- Set the Hostname
- Assign a hostname to your switch if it’s not already set.
Switch(config)# hostname MySwitch
- Assign a hostname to your switch if it’s not already set.
- Configure the Domain Name
- Set the domain name for your switch.
Switch(config)# ip domain-name example.com
- Set the domain name for your switch.
- Generate RSA Key Pairs
- Generate RSA key pairs required for SSH.
Switch(config)# crypto key generate rsa
- When prompted, specify the key modulus size (2048 bits recommended for higher security).
- Generate RSA key pairs required for SSH.
- Specify SSH Version 2
- Ensure your switch uses SSH version 2
Switch(config)# ip ssh version 2
- Ensure your switch uses SSH version 2
- Create a Local User Account
- Create a local user account for SSH access.
Switch(config)# username admin privilege 15 secret mySecretPassword
- Create a local user account for SSH access.
- Enable SSH on VTY Lines
- Enable SSH on the VTY lines.
Switch(config)# line vty 0 15
Switch(config-line)# transport input ssh
Switch(config-line)# login local
Switch(config-line)# exit
- Enable SSH on the VTY lines.
- Save the Configuration
- Save the configuration to ensure it persists after a reboot.
Switch# write memory
- Save the configuration to ensure it persists after a reboot.
Example Configuration
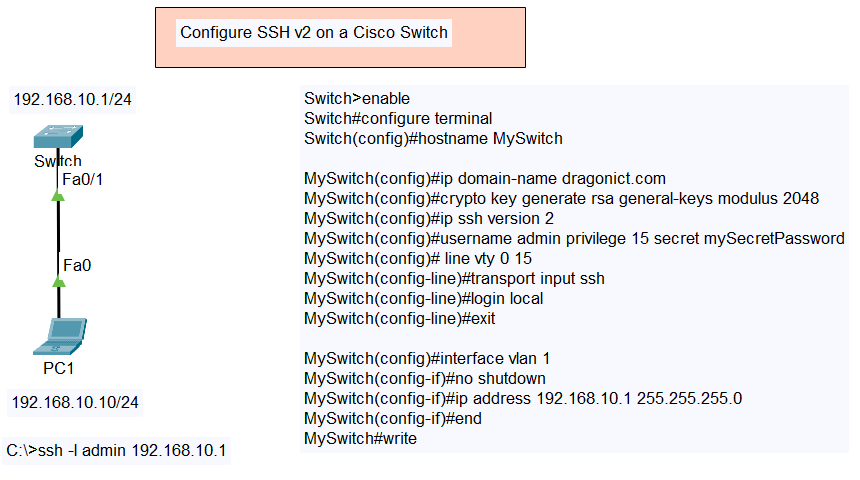
Here is an example of what the complete configuration might look like:
Switch> enable
Switch# configure terminal
Switch(config)# hostname MySwitch
MySwitch(config)# ip domain-name example.com
MySwitch(config)# crypto key generate rsa
The name for the keys will be: MySwitch.example.com
Choose the size of the key modulus in the range of 360 to 4096 for your General Purpose Keys.
Choosing a key modulus greater than 512 may take a few minutes.

How many bits in the modulus [512]: 2048
% Generating 2048 bit RSA keys, keys will be non-exportable...[OK]

MySwitch(config)# ip ssh version 2
MySwitch(config)# username admin privilege 15 secret mySecretPassword
MySwitch(config)# line vty 0 15
MySwitch(config-line)# transport input ssh
MySwitch(config-line)# login local
MySwitch(config-line)# exit
MySwitch# write memory
Conclusion
Configuring SSH v2 on your Cisco switch enhances security by encrypting management traffic. By following these steps, you can ensure that your remote access sessions are secure. Don’t forget to replace placeholder values with your actual hostname, domain name, username, and password.