Configure Telnet on a Cisco Switch with Local Username and Password
Introduction
Telnet is a widely used protocol that enables remote access to devices within a network. It allows network administrators to manage devices without needing physical access. However, Telnet is unencrypted, so it is essential to secure it by configuring strong authentication methods, such as local usernames and passwords. This guide will walk you through configuring Telnet access on a Cisco switch using a local username and password for secure management.
Network Topology
In this example, we have a simple network topology with a single Cisco switch (S1) connected to a PC (PC1). The switch is configured with an IP address on VLAN 1, which allows Telnet access from the connected PC. Below is the basic topology:
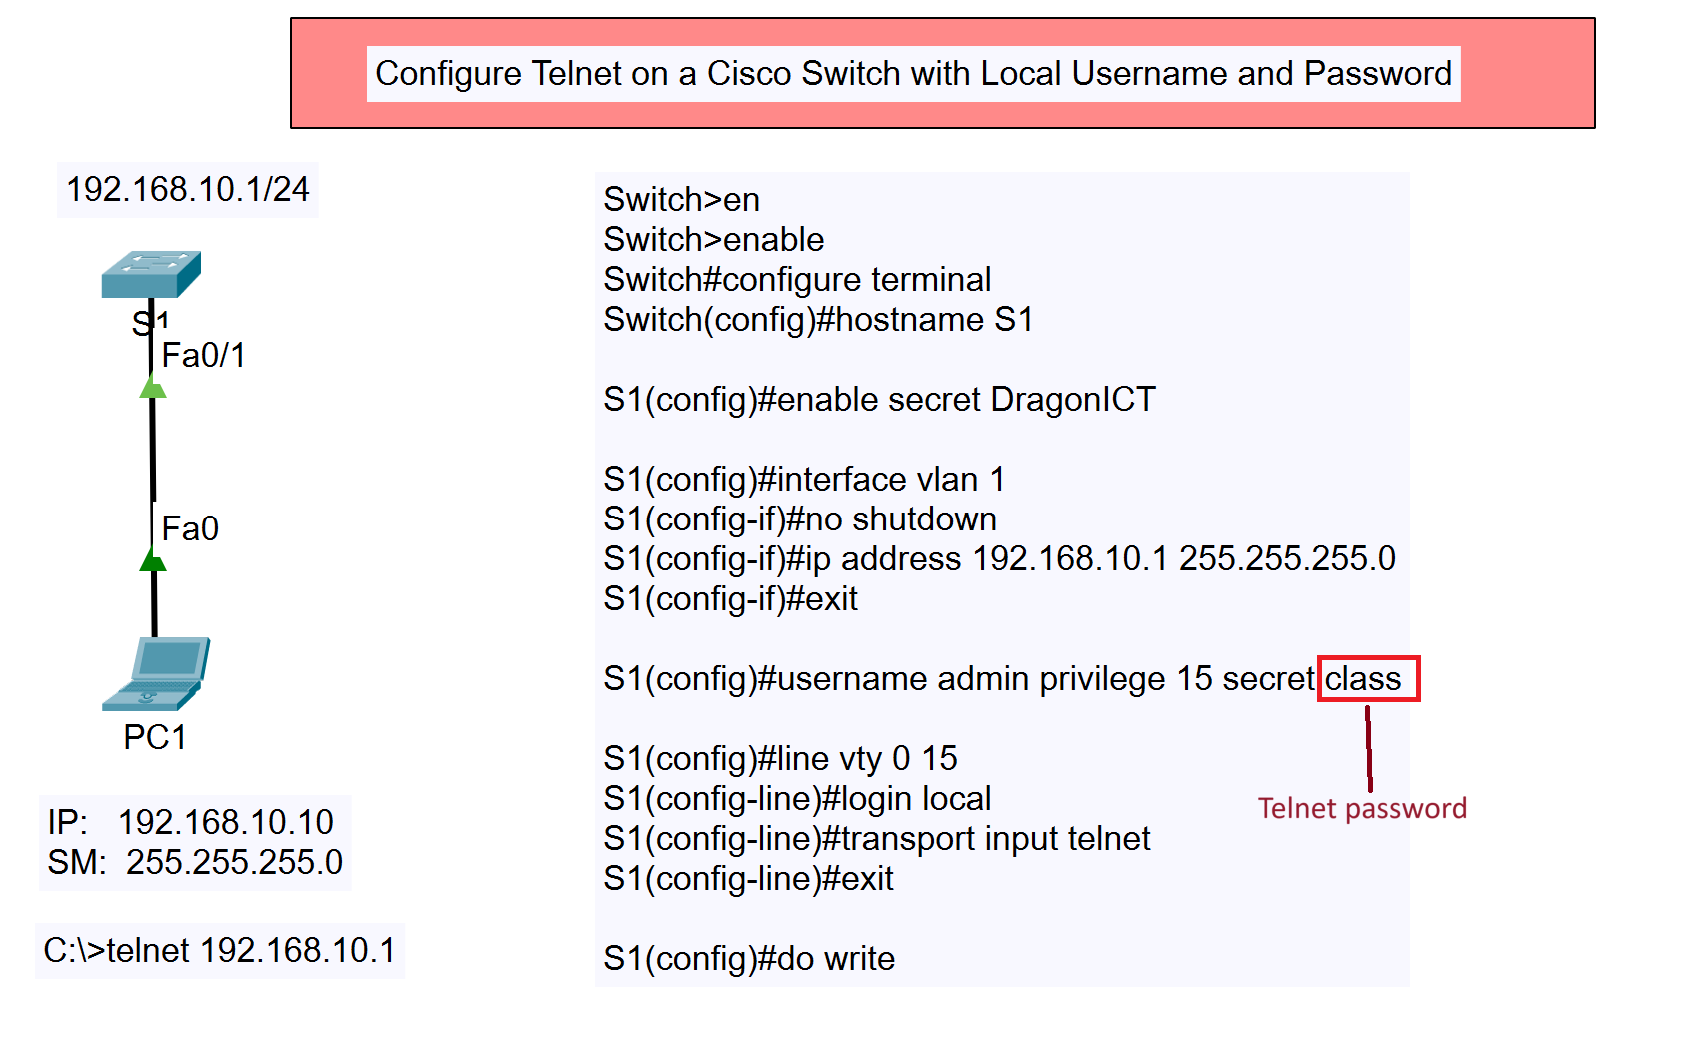
- Switch (S1): Cisco Switch
- IP Address: 192.168.10.1 (Assigned to VLAN 1)
- Hostname: S1
- PC (PC1): Connected to the switch
- IP Address: 192.168.10.10
- Subnet Mask: 255.255.255.0
Other Types of Telnet Configuration
- Configure Telnet on a Cisco Switch with Only a Password
- Configure Telnet on a Cisco Switch with Local Username and Password
- Configure Telnet on a Cisco Router with Only a Password
- Configure Telnet on a Cisco Router with Local Username and Password
Step-by-Step Configuration
Below is the configuration process for enabling Telnet on the Cisco switch with a local username and password.
- Access the Switch and Enter Global Configuration Mode
Connect to the switch via console or SSH and enter the privileged EXEC mode, then switch to global configuration mode:Switch>en Switch#configure terminal
- Set the Hostname
Set a meaningful hostname for the switch:Switch(config)#hostname S1
- Secure the Privileged EXEC Mode
Configure a secret password for accessing the privileged EXEC mode:S1(config)#enable secret DragonICT
- Configure VLAN 1 Interface
Assign an IP address to VLAN 1 and bring the interface up to enable network communication:S1(config)#interface vlan 1 S1(config-if)#no shutdown S1(config-if)#ip address 192.168.10.1 255.255.255.0 S1(config-if)#exit
- Create a Local Username and Password
Define a local user account with a privilege level of 15 (highest level) for administrative access:S1(config)#username admin privilege 15 secret class
- Configure Telnet Access
Enable Telnet on the virtual terminal (vty) lines and enforce local login authentication:S1(config)#line vty 0 15 S1(config-line)#login local S1(config-line)#transport input telnet S1(config-line)#exit
- Save the Configuration
Ensure the configuration is saved to the startup configuration to prevent loss after a reboot:S1(config)#do write
Verification
To verify the Telnet configuration:
- From the PC (PC1), open a command prompt or terminal.
- Use the Telnet command to connect to the switch:
C:\>telnet 192.168.10.1
- When prompted, enter the username admin and the password class.
If the configuration is correct, you should be granted access to the Cisco switch’s command-line interface.
Conclusion
By following the steps outlined above, you have successfully configured Telnet on your Cisco switch with secure local authentication. While Telnet is convenient for remote access, it’s important to consider using SSH for encrypted communication in production environments. Always ensure your network devices are securely configured to prevent unauthorized access.